|

How to Scan documents to PDF for eFiling Purposes

Scan a paper document to PDF and use Acrobat to turn it into a smart, searchable PDF with selectable text.

Scan a paper document to PDF

You can create a PDF file directly from a paper document, using your scanner and Acrobat. On Windows, Acrobat supports TWAIN scanner drivers and Windows Image Acquisition (WIA) drivers. On Mac OS, Acrobat supports TWAIN and Image Capture (ICA).

In Windows, you can either use the Autodetect Color Mode and let Acrobat determine the paper document’s content type, or use other presets (Black & White DocumentGrayscale DocumentColor Image, and Color Document) based on your judgment. You can configure the scanning presets or use the Custom Scan option to scan with the settings of your choice.

Note:

Preset scanning is available only for scanner drivers that support Hide Scanner’s Native Interface mode. The scanning presets are not available on Mac OS.

In Windows, if a WIA driver is installed for your scanner, you can use the Scan button on your scanner to create a PDF. Press the Scan button, and then in Windows, choose Adobe Acrobat from the list of registered applications. Then, in the Acrobat scan interface, select a scanner and a document preset or Custom Scan.

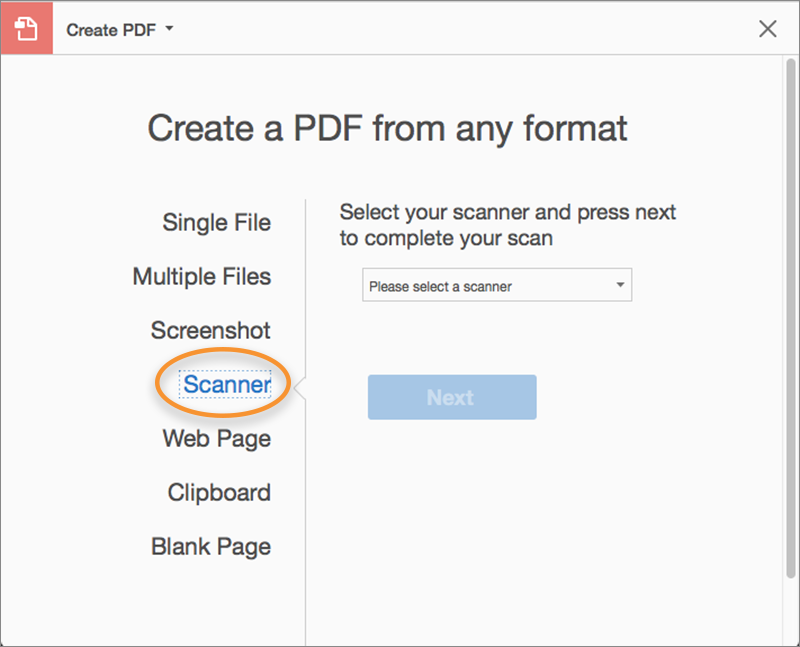
To scan a paper document to PDF using Acrobat, go to Tools > Create PDF. The Create a PDF from any format interface is displayed. Choose Scanner to see the options available.

On Windows:

Options for scanning a paper document to PDF

Create PDFs from Scanner interface; clicking the settings or gear icon shows all the settings for the selected option.


On Mac:

Options for scanning a paper document to PDF on Mac

Create PDFs from Scanner interface; choose a scanner and then click Next to see the settings for the selected Scanner.


Scan a paper document to PDF using Autodetect Color Mode (Windows)

  • Choose Tools > Create PDF > Scanner > Autodetect Color Mode.

    Note:

    If you want to append the document, which you’ll scan, to an existing file, do the following:

    1. Choose the Append to Existing File check box.
    2. If you’ve the files open in Acrobat, select an appropriate file from the drop-down list, or click Browse and then select an appropriate file.

    If you want to scan multiple files into a PDF, click the Settings  icon. The Custom Scan interface is displayed. Select the Prompt to scan more pages check box.

  • Click Scan.

  • If prompted to scan more pages, select Scan More PagesScan Reverse Sides, or Scan Is Complete, and click OK.

Scan a paper document to PDF using a preset (Windows)

  • Choose Tools > Create PDF > Scanner > [document preset].

    Note:

    If you want to append the document, which you’ll scan, to an existing file, do the following:

    1. Choose the Append to Existing File check box.
    2. If you’ve the files open in Acrobat, select an appropriate file from the drop-down list, or click Browse and then select an appropriate file.

    If you want to scan multiple files into a PDF, click the Settings  icon. The Custom Scan interface is displayed. Select the Prompt to scan more pages check box.

  • Click Scan.

  • If prompted to scan more pages, select Scan More PagesScan Reverse Sides, or Scan Is Complete, and click OK.

Scan a paper document to PDF without presets

  • Choose Tools > Create PDF > Scanner > Default Settings or My Custom Settings.

    Note:

    If you want to append the document, which you’ll scan, to an existing file, do the following:

    1. Choose the Append to Existing File check box.
    2. If you’ve the files open in Acrobat, select an appropriate file from the drop-down list, or click Browse and then select an appropriate file.
  • If you want to change the settings, click the Settings  icon. The Custom Scan interface is displayed. Select scanning options as needed.

    If you want to scan multiple files into a PDF, select the Prompt to scan more pages check box.

    Note:

    If you specify that you want to use the Show scanner’s user interface instead of the Acrobat user interface, other windows or dialog boxes appear. Consult the scanner documentation information on available options. In Mac OS, the scanner user interface is always shown.

  • Click Scan.

  • If prompted to scan more pages, select Scan More PagesScan Reverse Sides, or Scan Is Complete, and click OK.

Enhance or optimize a scanned PDF

  • Open a PDF created from a scanned document.
  • Choose Tools > Enhance Scans > Enhance > Scanned Document.

  • Select options in the Secondary toolbar – click the Settings  icon and choose appropriate options in the Enhance Scanned PDF dialog box, and click OK.

    For more information on the options displayed in the dialog box, see Enhance Scanned PDF dialog box.

Configure scanning presets (Windows)

  • Choose Tools > Create PDF > Scanner.

  • Select a preset: Autodetect Color ModeBlack and White DocumentColor DocumentGrayscale Document, or Color Photograph.

  • Click the Settings  icon next to the preset. Depending on your selection, the Custom Scan or Configure Predefined Settings for interface is displayed.

  • Adjust the settings as needed.

    If you want to scan multiple files into a PDF, select the Prompt to scan more pages check box.

  • Click Save Settings to save the preset, and then click the Cross button (X) to close.

Scanning options

After you select a scanner, you can choose or adjust its various scanning options as per your requirements.

Click here to see all the scanning options

Optimize Scanned PDF dialog box

The Enhance Scanned PDF dialog box controls the image settings of how scanned images are filtered and compressed for the PDF. Default settings are suitable for a wide range of document pages, but you may want to customize settings for higher-quality images, smaller file sizes, or scanning issues.

Click here to see all the image optimization options

Recognize Text – Settings dialog box

Document Language

By default the OCR language is picked from default locale. To change the language, click Edit and choose a different language.

Output

Either Searchable Image or Editable Text and Images.

Scanning tips

  • Acrobat scanning accepts images between 10 dpi and 3000 dpi. If you select Searchable Image or ClearScan for PDF Output Style, input resolution of 72 dpi or higher is required. Also, input resolution higher than 600 dpi is downsampled to 600 dpi or lower.
  • Lossless compressions can only be applied to monochrome images. To apply lossless compression to a scanned image, select one of these options under the Optimization Options in the Optimize Scanned PDF dialog box: CCITT Group 4 or JBIG2 (Lossless) for monochrome images. If this image is appended to a PDF document, and you save the file using the Save option, the scanned image remains uncompressed. If you save the PDF using Save As, the scanned image may be compressed.
  • For most pages, black-and-white scanning at 300 dpi produces text best suited for conversion. At 150 dpi, OCR accuracy is slightly lower, and more font-recognition errors occur; at 400 dpi and higher resolution, processing slows, and compressed pages are bigger. If a page has many unrecognized words or small text (9 points or smaller), try scanning at a higher resolution. Scan in black and white whenever possible.
  • When Recognize Text Using OCR is disabled, full 10-to-3000 dpi resolution range may be used, but the recommended resolution is 72 and higher dpi. For Adaptive Compression, 300 dpi is recommended for grayscale or RGB input, or 600 dpi for black-and-white input.
  • Pages scanned in 24-bit color, 300 dpi, at 8-1/2–by-11 in. (21.59-by-27.94 cm) result in large images (25 MB) before compression. Your system may require 50 MB of virtual memory or more to scan the image. At 600 dpi, both scanning and processing typically are about four times slower than at 300 dpi.
  • Avoid dithering or halftone scanner settings. These settings can improve the appearance of photographs, but they make it difficult to recognize text.
  • For text printed on colored paper, try increasing the brightness and contrast by about 10%. If your scanner has the color-filtering capability, consider using a filter or lamp that drops out the background color. Or if the text isn’t crisp or drops out, try adjusting scanner contrast and brightness to clarify the scan.
  • If your scanner has a manual brightness control, adjust it so that characters are clean and well-formed. If characters are touching, use a higher (brighter) setting. If characters are separated, use a lower (darker) setting.

Troubleshoot scanner issues

Recognize text in scanned documents

You can use Acrobat to recognize text in previously scanned documents that have already been converted to PDF. Optical character recognition (OCR) software enables you to search, correct, and copy the text in a scanned PDF. To apply OCR to a PDF, the original scanner resolution must have been set at 72 dpi or higher.

Note:

Scanning at 300 dpi produces the best text for conversion. At 150 dpi, OCR accuracy is slightly lower.

Recognize text in a single document

  • Open the scanned PDF.
  • Choose Tools > Enhance Scans > Recognize Text > In This File.

    The Recognize Text options are displayed in the Secondary toolbar.

  • In the Secondary toolbar, select a page range and language for text recognition.

  • Optionally, click Settings to open the Recognize Text dialog box, and specify the options as needed.

  • Click Recognize Text. Acrobat creates a layer of text in your PDF that can be searched — or copied and pasted into a new document.

Recognize text in multiple documents

  • Choose Tools > Enhance Scans > Recognize Text > In Multiple Files.

  • In the Recognize Text dialog box, click Add Files, and choose Add FilesAdd Folders, or Add Open Files. Then select the files or folder.

  • In the Output Options dialog box, specify a target folder for output files, and filename preferences.
  • In the Recognize Text – General Settings dialog box, specify the options, and then click OK.

    Acrobat creates a layer of text in your PDF that can be searched — or copied and pasted into a new document.

Recognize Text – General Settings dialog box

Document Language

Specifies the language for the OCR engine to use to identify the characters.

Output (PDF Output Style)

Determines the type of PDF to produce. All options require an input resolution of 72 dpi or higher (recommended). All formats apply OCR and font and page recognition to the text images and convert them to normal text.

Searchable Image

Ensures that text is searchable and selectable. This option keeps the original image, deskews it as needed, and places an invisible text layer over it. The selection for Downsample Images in this same dialog box determines whether the image is downsampled and to what extent.

Searchable Image (Exact)

Ensures that text is searchable and selectable. This option keeps the original image and places an invisible text layer over it. Recommended for cases requiring maximum fidelity to the original image.

Editable Text & Images

Synthesizes a new custom font that closely approximates the original, and preserves the page background using a low-resolution copy.

Downsample To

Decreases the number of pixels in color, grayscale, and monochrome images after OCR is complete. Choose the degree of downsampling to apply. Higher-numbered options do less downsampling, producing higher-resolution PDFs.

Correct OCR text in PDFs

When you run OCR on a scanned output, Acrobat analyzes bitmaps of text and substitutes words and characters for those bitmap areas. If the ideal substitution is uncertain, Acrobat marks the word as suspect. Suspects appear in the PDF as the original bitmap of the word, but the text is included on an invisible layer behind the bitmap of the word. This method makes the word searchable even though it is displayed as a bitmap.

Note: If you try to select text in a scanned PDF that does not have OCR applied, or try to perform a Read Out Loud operation on an image file, Acrobat asks if you want to run OCR. If you click OK, the Text Recognition dialog box opens and you can select options, which are described in detail under the previous topic.

  • Choose Tools > Enhance Scans > Recognize Text > Correct Recognized Text.

    Acrobat identifies suspected text errors and displays the image and text side by side in the Secondary toolbar. (All suspect words on the page are enclosed in boxes.)

  • Click the highlighted object or box in the document, and then correct it in the Recognized As box in the Secondary toolbar. Click Accept.

    The next suspect is highlighted. Correct mistakes as needed. Click Accept for each correction.

  • Click Close in the Secondary toolbar when the task is complete.

Similar Posts